Tuesday, August 26, 2008

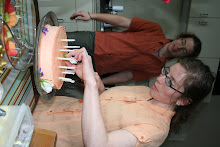
Almond mountain, our wedding cake


Each of the the three tiers (6", 9", and 12") was made of four layers of almond pound cake filled with rasberry curd-whipped cream and covered with rum buttercream. I decorated with borage and nasturtium flowers and leaves from the gardens of my friends and family. The raspberry curd was made from rasberries my mother picked from my aunt's yard, and the many dozens of eggs (ten or twelve?) that went into each component of the cake were all from hens and ducks (yes, huge duck egg yolks in the buttercream!) which roam in backyards from MA to ME.

I may need to make a separate post about the technical aspects of this cake, but I must mention that one clever idea I had that worked--and I am no fan of shortcuts in foodmaking, normally--I made almond paste using almond flour which I ordered (along with their Queen Guinivere cake flour) from King Arthur. I have become very particular about almond paste, and have found that good almond paste is not something you can buy (it is awful, the stuff I have found in stores, even in the most distinguished specialty shops), but few books I have read suggest making it at home. Fortunately I learned to make almond paste at my grandmother's knee, and tracked down her recipe in the 1975 edition of Joy of Cooking. My old method, when I've made it for marzipan, was to grind the almonds in the blender four times, but using pre-milled almonds saves a heck of a lot of trouble, does not cost more, and as far as I can tell, yields an acceptable result, certainly better than any commercial almond paste I've ever found! I had worried that the pre-ground almond meal would lack oils that freshly ground almonds would have, but the result seemed perfectly acceptable to me.

So worried was I that there would not be enough cake to go around, I made an extra 12" tier as backup! In truth, a cake this size should feed 150. There are still a few chunks of it in fridges around here..

photo courtesy of Drake King

Friday, July 25, 2008

Monday, May 26, 2008

Rosie's birthday cake


Almond hazelnut cake with mascarpone filling and a vanilla bean-flecked custard buttercream decorated with violets and white wild roses.. I also made --somewhat incongruous but delicious in its own right--mint ice cream flavored with a handful of spearmint poached from a then- uncultivated neighboring garden plot. (After eating the cake and ice cream we walked to the garden to find that at last, our garden neighbor had dug the entire plot, and the mint, thyme, oregano and all other perennials had been purged and were nowhere to be found!)

Wednesday, May 21, 2008

Root Beer


Some years ago, we began brewing our own root beer. One of our earliest dates together involved sitting on a park bench, sampling Fentiman's Burdock and Dandelion brew, which led us to contemplate the possibilities of brewing our own soft drinks.

That summer I discovered the restorative properties of a good root beer. If I was frazzled, or suffering from a headache, a bottle of root beer-- which my dear new love seemed always to supply at just the right moment-- would often do the trick. It didn't have to be an exotic variety like Fentiman's, but we soon found that a root beer made from something other than synthetic flavorings was difficult to find.


Eventually we tracked down a book on the subject, amassed a collection of bottles, found an antique bottle capper, and developed a technique to make our own. In spring 2007 we composed the following set of instructions to hand out at the Boston Skillshare.

Root Beer Making at Home
with
Darrah and Rosie

Basic Equipment:
Heavy, unthreaded glass bottles, bottle capper, and bottle caps.
Recycled Sam Adams bottles work well!
You can also use screw-top plastic bottles in lieu of glass.
Brew-pot – at least 6 Qt.
A big stainless stock pot works well.
Strainer – to filter the wort.
Jug, carboy or food-grade plastic pail – a five-gallon bucket is ideal.
Sanitizing tub & unscented chlorine bleach (2 tbsp per gallon)

Time-saving Devices:
Racking cane, filler tube, and siphon tubing.
“Jet” bottle washer.
Kitchen scale/gram balance.

Root Beer:
Measurements are given by weight with approximate volume conversions. This recipe is made dried ingredients, but it may be interesting to you to experiment with fresh foraged plant matter also. Cambridge Naturals is a good source for dried herbs and roots. This recipe makes one gallon, but you can easily scale it up. This recipe adapted from one published by Fleishman’s yeast company in 1912.

½ oz. (3 T) sassafras root
½ oz. (3 T) juniper berries
¼ oz. (½ cup) leaf hops
¼ oz (1 T) dandelion root
a few drops wintergreen oil
1 lb sugar
1 gal. water
1/8 t granulated ale yeast
Boil in half the water the roots, berry, and leaf for 20 minutes. Strain. Add sugar and the remaining water. Allow to cool to lukewarm. Dissolve the yeast in a ¼ cup of the liquid, and stir it into the pot. Proceed with bottling. Begin to check carbonation after 18 hours. Refrigerate as soon as it’s ready! KEEP COLD!

Useful References:
Stephen Cresswell, Homemade Root Beer, Soda & Pop. Storey Publishing. 1998.
Euell Gibbons, Stalking the Wild Asparagus. Alan Hood & Co. 1988.
Saunders, Charles, Edible and Useful Wild Plants. Dover. 1976.

Friday, April 25, 2008

garden

At last, just when I had given up hope, our number came up for a community garden plot. 100 square feet of raised bed now ours.
We have already gathered many seeds for favorites that tend not to show up as much as we might like in our CSA share or at the farmer's markets. Broccoli raab, in particular (we have procured a 30-day and a 60-day variety), but also rocket (including a wild, perennial variety), brussels sprouts, bitter melon, fennel, haricot verts... I also have seeds for borage and corn salad which I would like to try again--I had poor luck growing them in containers last year.

We  are also going to try growing hops for our root beer. This probably deserves a separate post, but there's not much to tell yet: today I visited the brew store to buy the rhizomes. I chose two noble hops: Mt. Hood and Sterling. 

Tuesday, April 22, 2008

fresh pasta


Twice now we have made lasagna and made the noodles for it. I have been using the pasta recipe from Alice Waters' the Art of Simple Food, a book I have used and appreciated a great deal recently.
An interesting revelation regarding the grain: 
for today's preparations I  coached my dear one over the phone on the modifications I make to this recipe, as he was to mix up the pasta dough before I got home.  Some weeks ago, I bought a bag of Bob's Red Mill semolina. It is coarse and yellow. In my first batch of pasta I used half of this semolina, half all-purpose flour. This resulted in a stiff dough that was difficult to roll out by hand (though the finished lasagna was quite delicious). In this house, we also have indian semolina, or sooji, and it is lighter though still coarse. In any case, my companion used the sooji (his culinary predisposition is toward indian food) and a different (lower) proportion of semolina to all-purpose flour, and the result was a wonderfully tender noodle. This substitution led me to appreciate that the atta, or chapati flour we use for making indian parathas and roti  is also a durum wheat, and semolina comes from the endosperm of durum wheat.